Super simple steps to dive into GraphQL using REACT.

Have you heard of the term 'GraphQL' before ? Well I didn't know about it for a long time. When I started learning React, everywhere whether it is a tutorial platform or blog I could see some content related to GraphQL. It was then I started to venture into it.
So what is GraphQL? Well technically it is a query language for APIs and a runtime for fulfilling those queries with your existing data. Let's leave that apart, to simplify it is just like instructing the burger man to give you the burger ingredients of your choice in your favorite subway. So did you get it? you want olive seeds you ask for it, you want brocolli you ask for it, even though you have option for extra cheese you avoid it because you are getting fat :).

In the same way GraphQL helps you to manipulate your query based on your required parameters. Lets say in a page you want only the username of the user to be displayed, you request only for the username to the backend instead of all the user's details. In another page you need the entire user data because you are building a profile page so you request for all the data from backend. It lets you avoid unnecessary data. Enough of the theory lets code.
Step-1 (Setup the back-end)
First we need to build a back-end service where we will have the restful urls for ourresource users. Here we are using node with express and mongodb. We all are familiar with RESTful routing. Here are some routes which we will build:
Using postman lets add some data to it. Assuming we add the following details:
We will additionally create a GET /email which will give us the user assosiated with the particular email
Step-2 (Install graphql and express-graphql)
npm install --save graphql express-graphql
Step-3 (Configure the middleware for graphql)
Now the Graphiql interface will be available at http://localhost:{port}/graphql. Port is where your node backend is running.
Step-4 (Create the schema file)
Next we need to create the schema file. The schema file is responsible for all GraphQLObjects, RootQuery and Mutations. A sample UserType GraphQLObject looks like this:
Step-5 (Define the Root query)
We need to define the root query for GraphQL to know from where to start.
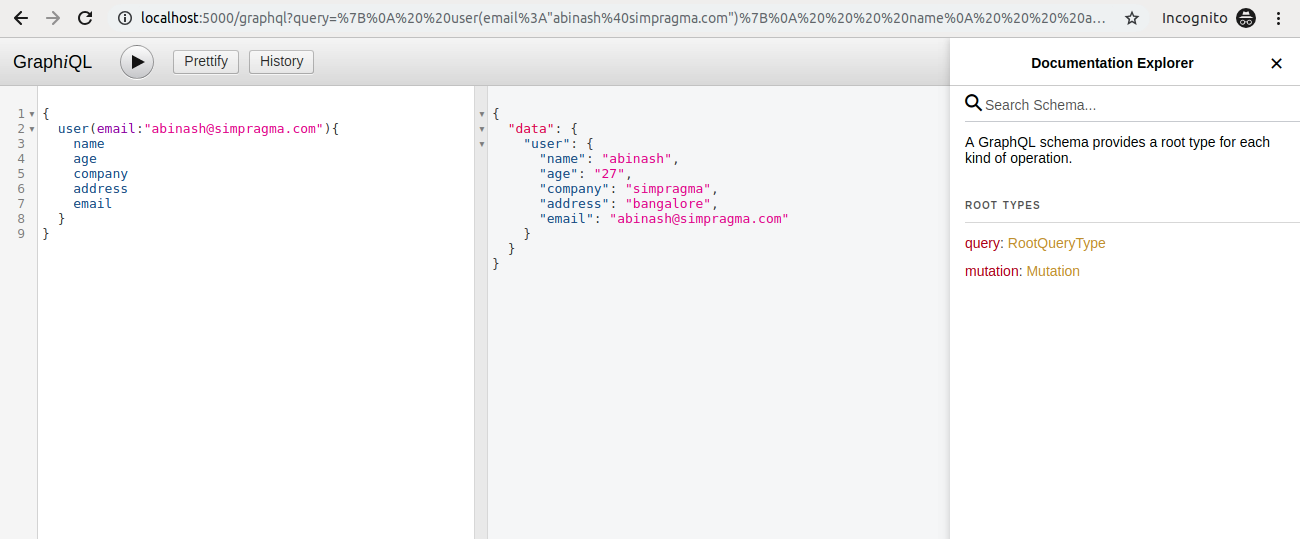
Step-6 (Test your query from GraphiQL)
Now let's test our first query from GraphiQL. Visit http://localhost:5000/graphql. Enter the following code and press the play button.
You also automatically get the Docs in the Documentation Explorer at the right hand side of the interface.
Step-7 (Build the front-end)
Let's build the front-end side of the application using React and Apollo-Client. Where we will do a simple query to display user details based on the email address.
Bootstrap your react application using create-react-app and install apollo-boost and graphql.
npx create-react-app client
npm install --save apollo-boost graphql
Step-8 (Setup ApolloProvider)
Wrap your Root app with ApolloProvider
Step-9 (Create Login page)
Let's create our first page Login.js where we will write our graphql query. First lets create our class and define the state
Now let's create the form to submit the email address and fetch details
Step-10 (GraphQL query from front-end)
Import the required modules. First we need to write the GraphQL query exactly the same from the GraphiQL interface and then handle the returned details from it.
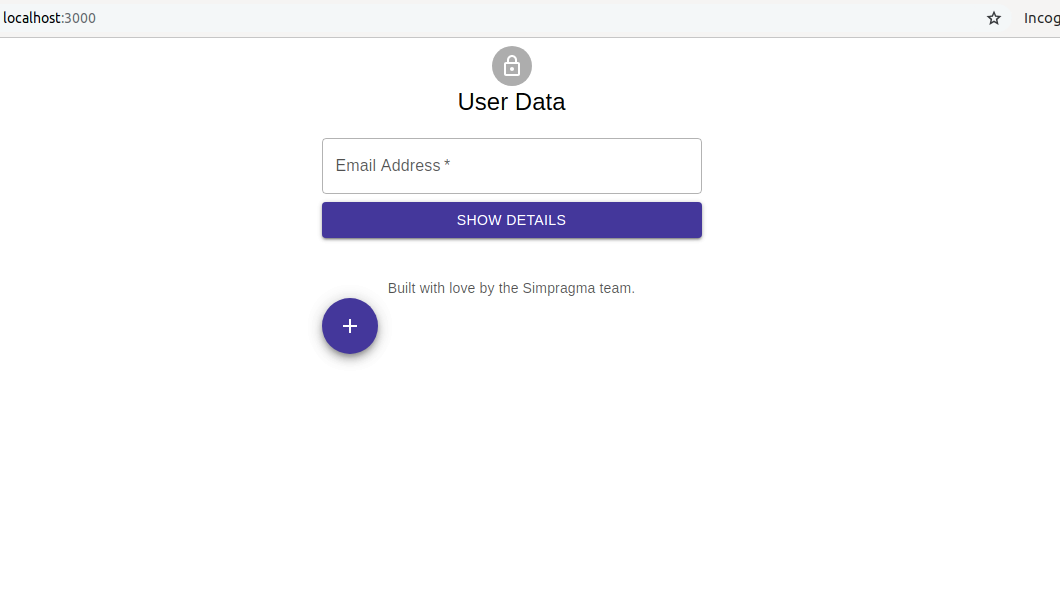
Step-11 (Lets test)
Run it on browser, visit http://localhost:3000
